How to sift through all of the options and make your chain game strong.
By Toby L. Walrath
There are many ways that trap chains can be rigged for different setups, but with so many options available these days, knowing which way is best can be confusing. Despite all of the various opinions about trap chain rigging, there are a few principles that trappers must understand to clear up the confusion.
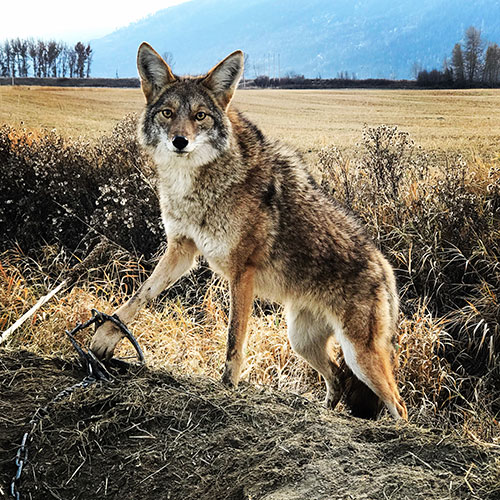
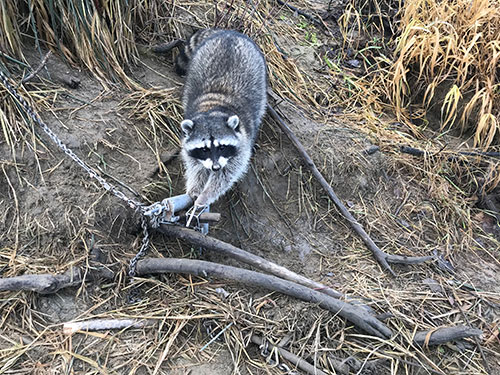
No matter the style of foothold trap you choose, a center-mounted D-ring and chain length appropriate for the type of anchor are key elements to a good chain rig. Photo credit Toby L. Walrath.
The first thing to consider is the type of stake that you’re going to use. Two types of stakes are most prominent for the modern trapper; earth anchors and rebar stakes. If you plan to use an earth anchor to stake your trap, you can use a shorter trap chain than if you plan to use a solid metal stake, like rebar. Using this as a guideline will help get you started building the best chain rigs for your traps.
I consider a long chain to be anything longer than 30 inches in overall length. A short chain is anything less than 18 inches. There are many things to think about when building the chain rigging for traps. Starting at the stake and building your way back to the trap is the best method because the holding power of each style of stake comes from a different place. It is vital to understand the difference.
An earth anchor holds by the force of an anchor that rests in the ground horizontally, which holds it in place no matter what direction it is pulled. This creates exceptional holding power. An earth anchor isn’t restricted in the way it can be pulled on and a shorter chain prevents the animal from gaining momentum and pulling hard. Even with a short chain, if a large coyote stands up with a trap on its front paw it can’t exert enough force to pump the stake out of the ground.
In contrast, a rebar stake holds because of its vertical position in the soil, which is why it must be driven into the ground straight up and down. As long as the pulling force isn’t upward, the rebar stake will hold. A long chain is required for rebar stakes to ensure that the pulling force is never upward. Making sure that the chain is longer than a trapped animal can jump will be sufficient.
The decision about the type of stake you will use is very important because it determines the overall length of the rigging. There are pros and cons to both methods, and depending on the conditions you trap in, either one may work better. I recommend learning about both methods before choosing one.
There are many high-quality products on the market and trappers have options to try any number of configurations. With that in mind, there are some basic principles for building good rigging that are necessary — but that doesn’t mean that there is only one way to do it right.
For either anchoring method, a D-ring attached to the center of the trap frame is a good idea and should be used if possible. This will ensure that any trapped animal is pulling in direct alignment with the trap chain and anchor, preventing the paw from sliding back and forth or depressing trap levers on coilspring traps. If your trap chains are currently attached at the end of a longspring or the outside edge of the trap frame, it will still work, but is not the best setup.
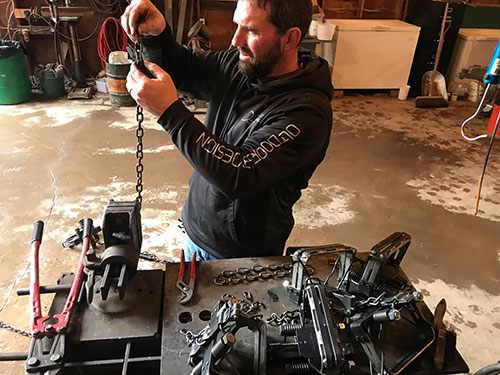
Travis Lierman counts the individual chain links to make sure that every chain setup is rigged the same way. Photo credit Toby L. Walrath.
A swivel placed within six inches of the base plate of the trap and the addition of at least one more between the trap and the anchor makes sure that the chain will not become kinked or twisted. This is important with any trap chain rig to prevent the animal’s paw from twisting inside the trap jaws and pulling free.
A word of caution about swivels, it may seem like a good money-saving idea to reuse J-hooks when attaching swivels, but at 12 cents each, I don’t think it’s worth the risk of using a weak J-hook. Buy new J-hooks in bulk and set with confidence that your trap rigging is going to hold. I know trappers who weld every J-hook together, and it’s a good practice, although it is not absolutely necessary.
RIGGING FOR EARTH ANCHORS
When rigging trap chain for earth anchors I like to have one swivel within a few chain lengths below the frame and another 6 inches below that, and another 6-inch length of chain. This basic design keeps the chain short with multiple swiveling points.
Adding an inline spring to the trap chain is not absolutely necessary. In my experience, I think it can help to prevent some pullouts, and it does appear to reduce strain on the animal. But the trade-off is that there is one more moving part in the rigging and it costs money to rig every trap with one. Inline springs strong enough to handle coyotes cost about $3 brand new, but are easy to install. I like to attach either end of the spring to the chain with a swivel. It’s important that the inline spring is not fastened any closer than 12 inches to the trap, or the spring will end up underneath the trap and make bedding difficult.
Another 6 inches of chain with a swivel at the end completes the short chain rig. If you don’t use an inline spring then I recommend using three swivels with 12-18 inches of chain.
I like to use a strong quick link through the J-hook of the bottom swivel because I can change out the earth anchors if they become damaged, or if I can’t pull them out. I have noticed that if the quick link is coated with wax then the threads of the quick link are held firm. I’ve never lost an animal using quick links, but I have had them loosen up, so the wax is added assurance.
Earth-anchor styles come in many varieties, but the basic design is a piece of cable or chain less than 24 inches in length connected to a metal point that is about 2 or 3 inches long. I prefer the bullet-point style for the rocky soil that I deal with, although there are several to chose from. The point is driven into the ground with a solid steel driver and the other end is connected to the trap chain rigging. When the driver is removed, the metal point is left under the ground in a vertical position. A sharp upward tug on the stake moves the metal point to a horizontal position under the ground and the stake is set. The result is incredible holding power that comes by way of resistance from the point of the stake.
One downside for me is that the drivers used for earth anchors become damaged frequently in rocky soil and need repair. I’ve been frustrated many times when they became stuck or broken. When running 100 traps or more I don’t have time to deal with broken gear.
Another thing that’s difficult to deal with is that pulling an earth anchor out once it is set can be almost impossible without a specially designed stake puller, and sometimes it also takes some digging with a shovel. When using earth anchors, you may end up leaving stakes in permanently and the cost of those stakes over time can really add up. If you trap in the same place year after year this might be okay, but permissions and animal populations change often. For me it isn’t cost effective.
The idea is that the anchor cannot be pulled or pumped up no matter how hard the animal pulls and a short trap chain will keep them from gaining enough momentum to pull hard on the chain. The shorter the trap chain rigging the better when using earth anchors. The major problems with this staking method is the difficulty in pulling them and the frequency of damaged drivers that interrupts me from setting traps which I don’t like, but as far as holding power, it’s the best.
RIGGING FOR REBAR STAKES
A traditional stake like the ones I use are made from a single piece of ½-inch rebar with a solid, wide head welded on top. The stake is slipped through a stake swivel at the end of the trap chain and is driven into the ground, then left in place for the duration. The holding power of a rebar-style stake comes from its vertical position in the ground. If a short chain were used with a single rebar stake it wouldn’t take much for a trapped animal to pull the stake straight up and out of the ground.
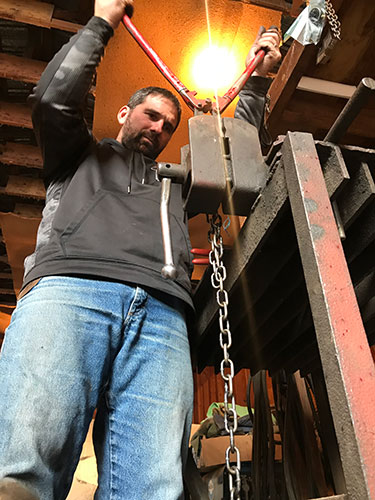
Travis Lierman setting up wolf trap chain rigging. Photo credit Toby L. Walrath.
In fact, one of the reasons that I like to use rebar stakes is because when running longlines I move my sets every 14-18 days, and rebar stakes allow me to pull sets quickly. I just grab onto the trap chain and pull straight up and I’m off to the next set. Sometimes I must use my trap puller, but it rarely takes more than 30 seconds to pull a set.
Although I can pull the stakes easily, they hold trapped animals very well because with a long chain length, the stake is pulled sideways and not upward. Some trappers use two stakes driven in at opposing angles called double staking, which is effective, but also makes moving traps more difficult. I prefer to use one 24-inch stake with a 30-inch or longer trap chain. I have caught hundreds of animals using this rigging and have found it to work the best when constantly moving traps.
When building the rigging for traps staked with rebar I prefer 3 feet of twist-link chain with at least three swivels. When roaming through conventions or yard sales during the summer months, I am always on the lookout for used chain in good condition. As a result, my trap riggings are a mix of various types of chain, but I avoid double-loop chain and instead choose the much stronger straight-link or twist-link chain sizes between #2 and #5 — especially for coyotes. I keep the price of new chain in mind and try to buy used chain at no more than half that cost.
I prefer to use a single flat stake swivel at the end of the chain and one stake. The result is a swivel that can move around the head of the stake, and when used in conjunction with two more swivels in the chain, this set up is my personal favorite. I do not use inline springs when using a long trap chain. After many years of trapping I don’t find it necessary.
RIGGING FOR DRAGS
There is another way to anchor traps that’s worth mentioning, and that is the use of drags. Drag rigs are outstanding setups to use for speed setting and efficiency, especially when using dogproof traps or when sets can be made without digging trap beds, like along riverbanks or ponds. The real advantage for me is time, but this type of rigging also prevents a big catch circle from forming, that can destroy a set location and gets noticed by anyone who happens by. I generally only use drags where it is very brushy when I want my target catch to pull the trap and drag it away from the set.
When rigged correctly for drags, a long chain tangles up animals quickly. Photo credit Toby L. Walrath.
Drags are good as long as the conditions and the species match up. For really brushy areas, a rig of 8 feet of straight- or twist-link chain with three swivels and a steel, two-prong drag is perfect. In more open areas where a stake can’t be driven into the ground, a drag can still be effective, but a longer chain up to 12 feet in length should be used. I avoid using double-loop chain when building a drag rig for larger species like coyotes or bobcats, but wouldn’t hesitate to use it for raccoons.
The main things to remember when building trap chain rigging is that the chain should be in good condition, built with several swivels and the overall length should match the type of anchor you will use. I use all three methods on my traplines depending on the conditions I am faced with. By keeping these simple concepts in mind, you can be confident that your trap chain rigs are set correctly, no matter the environment that you trap in.
How to Call Wolves With Your Voice – The Ultimate Challenge